.: I sometimes envy with other self-hosted WordPress blogs out there - they had the best plugins and widgets! :-(
One example of widget that is very useful for any Blogger blog is the related post widget. Why we need to have this widget? This is because:
- it increases our pageviews, where our readers will keep reading and browsing other posts after finish reading one.
- it's indirectly help our readers search or find other related post from our blog.
- blog with related posts looks so "advanced", thus making other blogger envy with our blog and want to have one too~ Lol~
Before this there is no official gadget made by Blogger and many have to use complicated hacked Blogger HTML script if they want to enable this related post widget, like you can see in this
BloggerPlugins and
JackBook example. This continue to haunts many tech-savvy blogger out there until this one site offers an easy and simple way to set up a related post widget in their Blogger blog - plus it comes with thumbnails too!~ :-)
LinkWithin, the Blogger savior is a free widget that appears under every post we had in our blog, and it links to related stories from our blog archive. The best part is it shows the image thumbnails too, so it is recommended to put at least one picture in every post we write because this picture will become the widget thumbnail.
LinkWithin works by retrieving and indexing all posts from our blog in their server, and later show them in the Blogger widget. Related posts is chosen from their title relevance, tags and their content. In my personal blog, LinkWithin shows related posts according to it's popularity - the most popular post is always shown rather than not-so-popular post. But this don't happens regularly, hurmmm.. :-?
To install this LinkWithin widget, we need to
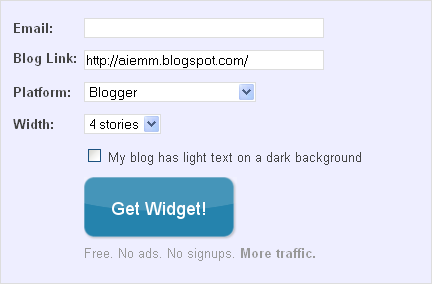
register our blog with them first. Write down our e-mail and our blog URL too. Choose Blogger as our platform (and you can choose other platform too), and then choose how many stories or related posts you want to appear in your widget. You should tick the empty box if your blog has dark background.
 |
| LinkWithin blog registration. |
You should see a page similar to the picture below, and click the blue 'Install Widget' link to import LinkWithin into our blog.
 |
| Click 'Install Widget' and it will open a new window/tab. |
Choose our desired blog, and click the blue 'Add widget' button.
 |
| Select the desired blog, and the title can be renamed too. |
Now our blog has been related-posts-enabled~ Yeahhh, rejoice~~ :-D If you would like to see how LinkWithin work, you can see example of it under this post ;-)
aiemm: "How to persuade our readers to read more of our blog?"
;-)
:.


